Celebrating Texas Independence Day
Many people have attempted to identify what exactly makes Texas, well Texas?
At Texicureans, we celebrate all of the unique cultures that contribute to our state’s culinary pallet. We like to say Texas is much more than BBQ and Tex-Mex. But this month, we are going to honor the Texas trait that transcends the differences any of us may have – independence. And how fitting, because this month we celebrate Texas Independence Day.
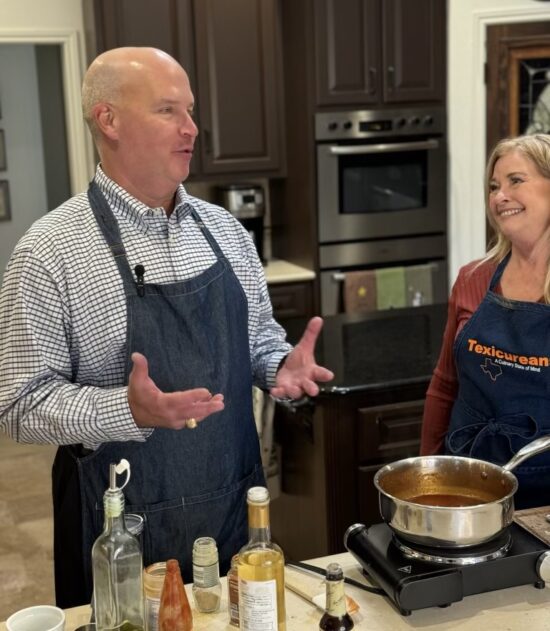
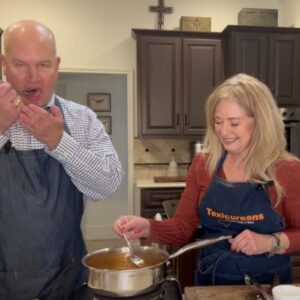
In search of the origin of that signature Texas independent spirit, we enlisted Justice Ken Wise. As a Judge, Texas historian, and podcast host of “Wise about Texas”, he was the perfect person to make this month’s recipe – Sam Houston’s BBQ sauce. So, tether your horse and come in for a while for a history lesson with Justice Wise as we roll up our sleeves and set about recreating Texas’ Father Sam’s BBQ Sauce.
Texas Independent Spirit
Justice Wise explains, “Texas has the most unique and interesting history of any state in the Union in my judgment and the judgment of many others. Texas has existed in several different conditions. It was unexplored for the longest time, we had a large indigenous population, we have international borderlands and all of that always combines to make the history very interesting.”
“It took a special kind of person to make a life here in Texas. That’s why you get so many fascinating characters and an independent spirit that survives to this day. And that’s why people want to come to Texas.” – Justice Ken Wise
About Sam Houston
Bigger than life, intelligent, adventurous, wild, and a natural-born statesman. Sam Houston is known as the Father of Texas with the distinction of being the first President of the Republic of Texas and the 7th Governor of the State of Texas.
Born in Virginia on March 2nd, 1793 (does that date ring a bell?) he is the only individual to serve as governor of two states – Tennessee and Texas.
As a teenager, he ran away from home to live with the Cherokee for three years. After divorcing his first wife, he moved to Texas in 1832, quickly rising to be a top-ranking official in the Texian Army. He led the Texians to victory at San Jacinto – a decisive win for the Texas war for independence against Mexico in 1836.
Fast forward to 1839 when 46-year-old Houston attended a garden party in Mobile Alabama, meeting 20-year-old Margaret Lea. They were wed a year later, subsequently moving to Galveston. Although the couple was separated for long periods due to Sam’s travel, they wrote frequent letters to show their love and devotion to one another.
Justice Wise and I spent a few minutes chatting about lesser-known facts concerning Sam Houston.
As mentioned above – he was born on Texas Independence Day – March 2nd. “He was a diplomat to the Cherokee and other Native American tribes. He had a wealth of experience as a Statesman before he got to Texas and he was invited to come to Texas by some individuals who recognized that something was going to happen – they weren’t sure what. So, they needed a Statesman – someone with political experience to help guide them through the situation. That’s how he got to Texas.” shares Justice Wise. An interesting side note to this is that “statesmanship or political leadership and the wisdom that comes with the experience was really its own craft and was not very common at the time.”
Justice Wise continues, “Sam Houston liked to party. Period. Yes, he was well known for that. He was a big guy (obviously liked to eat) and the way you would put your best foot forward would be to cook BBQ for people. He married Margaret Lea, First Lady of the Republic of Texas when he was in his late forties and she was 21, from Alabama. She got him to quit drinking, and be baptized in the Baptist church in Independence Texas. Their love for each other is evident in their letters which survived and you can read to this day.”
On that note, we asked Justice Wise about some of the historical factors that set Texas women apart in their strength and character. Justice Wise, “Many of the Texans I talk about on my podcast, are individuals who did heroic things, they just happen to be women. For the longest time, I don’t think that was focused on and I still don’t think it’s focused on as much as it should be.”
“If you think about this, Texas was created out of revolution. And if you have a revolution and the men go off to fight, you had to fight off any hostiles, you had to grow your own food, you had to do all of that. If the men went off to fight, guess who had to do it all? The women. And they did.”
“One interesting fact related to the legal world in Texas, we had an all-female supreme court in 1925. There was a case where pretty much every judge in Texas would be recused from it so the Governor decided to appoint three women to the Texas Supreme Court to hear that case. That had never happened in United States History. There are fascinating stories like that throughout Texas history.”
Hear and learn more about Texas History from Ken Wise on his podcast “Wise About Texas” which “presents Texas history in an engaging, scholarly and interesting way. You’ll learn more about the Texas history you know, and a lot of Texas history you don’t know” according to Wise.
We found the recipe for Sam Houston’s BBQ sauce in “Early American Cookbook” by D. Kristie Lynn and Robert W. Pelton. Like many old recipes handed down, we can’t be sure of the exactness, but I think you’ll be very pleased adding this to your BBQ repertoire. You can find the recipe below and on www.texicureans.com. Go to YouTube for a demonstration and join our email list for weekly recipes – historical and otherwise!
March is Texas’ birthday month – and now you know – Sam Houston’s birthday month!
Sam Houston's Famous BBQ Sauce
Fresh and a Blast from the Past
Prep Time 10 minutes mins
Cook Time 20 minutes mins
Course Sauces
Cuisine American
- 3 TBSP cooking oil
- 1/4 cup grated onion
- 1 clove garlic, crushed
- 1 cup catsup
- 1/4 cup worcestershire
- 1/4 cup lemon juice
- 2 tbsp white vinegar
- 1 tsp hot pepper sauce
- 3/4 tsp salt
- 2 tbsp sugar
- 2 tsp paprika
- 1 1/2 tsp chili powder
- 1 tbsp dry mustard
- 2 tsp water
Heat the cooking oil in a large heavy cast iron skillet. Add the onion and the garlic. Sauce this lightly. Stir in the catsup, Worcestershire sauce, lemon juice, white vinegar, hot pepper sauce, sugar, paprika, chili powder and salt.
Blend together thoroughly the dry mustard and the water until smooth. Then stir this into the sauce. Slowly bring this mixture to a boil.
Cover and let simmer for 20 minutes. Makes 2 cups.
Sam used this spicy concoction both as a marinade and a batting sauce for his barbecued steaks, chops and chicken.
Keyword BBQ Sauce, Marinade, Basting BBQ sauce